Build a Container
build is the “Swiss army knife” of container creation. You can use it to
download and assemble existing containers from external resources like
Singularity Hub and Docker Hub. You can use it to convert
containers between the various formats supported by Singularity. And you
can use it in conjunction with a Singularity recipe file to
create a container from scratch and customized it to fit your needs.
Overview
The build command accepts a target as input and produces a container as output.
The target defines the method that build uses to create the container. It
can be one of the following:
URI beginning with shub:// to build from Singularity Hub
URI beginning with docker:// to build from Docker Hub
path to a existing container on your local machine
path to a directory to build from a sandbox
path to an archive in .tar or compressed .tar.gz format
path to a Singularity recipe file
In addition build can produce containers in three different formats. Formats
types can be specified by passing the following options to build.
compressed read-only squashfs file system suitable for production (default)
writable ext3 file system suitable for interactive development (
--writableoption )writable (ch)root directory called a sandbox for interactive development (
--sandboxoption)
Because build can accept an existing container as a target and create a
container in any of these three formats you can convert existing
containers from one format to another.
The following diagram illustrates the targets that can be supplied to build
as inputs and the containers build can produce as outputs. Green arrows
represent operations that can be carried out without root privileges
(though the container may not perform properly when run as root). Red
arrows represent operations that must be carried out with root
privileges.
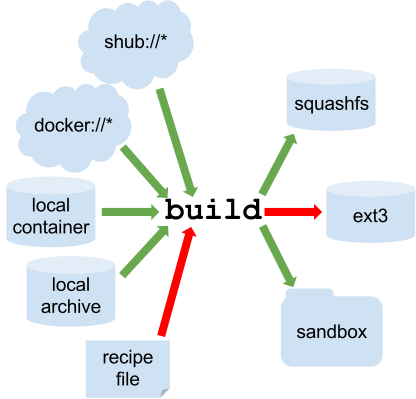
Singularity build process
Downloading a existing container from Singularity Hub
You can use the build command to download a container from Singularity Hub.
$ singularity build lolcow.simg shub://GodloveD/lolcow
The first argument (lolvow.simg) specifies a path and name for your container.
The second argument (shub://GodloveD/lolcow) gives the Singularity Hub URI from which to download.
But default the container will be converted to a compressed, read-only
squashfs file. If you want your container in a different format use
the --writable or --sandbox options.
Downloading a existing container from Docker Hub
You can use build to download layers from Docker Hub and assemble them into
Singularity containers.
$ singularity build lolcow.simg docker://godlovedc/lolcow
Creating --writable images and --sandbox directories
--writable
If you wanted to create a writable ext3 image similar to those used by
Singularity version < 2.4, you could do so with the --writable option. You must
create writable containers as root.
Extending the Singularity Hub example from above:
$ sudo singularity build --writable lolcow.img shub://GodloveD/lolcow
The resulting container is writable, but is still mounted as read-only
when executed with commands such as run, exec, and shell. To mount the container
as read-write when using these commands add the --writable option to them as
well.
To ensure that you have the proper permissions to write to the container as you like, it is also a good idea to make changes as root. For example:
$ sudo singularity shell --writable lolcow.img
--sandbox
If you wanted to create a container within a writable directory (called
a sandbox) you could do so with the --sandbox option. It’s possible to create a
sandbox without root privileges, but to ensure proper file permissions
it is recommended to do so as root.
$ sudo singularity build --sandbox lolcow/ shub://GodloveD/lolcow
The resulting directory operates just like a container in an image
file. You are permitted to make changes and write files within the
directory, but those changes will not persist when you are finished
using the container. To make your changes persistent, use the --writable flag
when you invoke your container.
Once again, it’s a good idea to do this as root to ensure you have
permission to access the files and directories that you want to
change.
$ sudo singularity shell --writable lolcow/
Converting containers from one format to another
If you already have a container saved locally, you can use it as a
target to build a new container. This allows you convert containers from
one format to another. For example if you had a squashfs container
called production.simg and wanted to convert it to a writable ext3 container called development.img you
could:
$ sudo singularity build --writable development.img production.simg
Similarly, to convert it to a writable directory (a sandbox):
$ singularity build --sandbox development/ production.simg
If you omit any options you can also convert your sandbox back to a read-only compressed squashfs image suitable for use in a production environment:
$ singularity build production2 development/
You can convert the three supported container formats using any combination.
Use care when converting writable ext3 images or sandbox directories to the default squashfs file format. If changes were made to the writable container before conversion, there is no record of those changes in the Singularity recipe file rendering your container non-reproducible. It is a best practice to build your immutable production containers directly from a Singularity recipe file instead.
Building containers from Singularity recipe files
Of course, Singularity recipe files can be used as the target when
building a container. For detailed information on writing Singularity
recipe files, please see the Container Recipes docs.
Let’s say you already have the following container recipe file called Singularity
, and you want to use it to build a container.
Bootstrap: docker

From: ubuntu:16.04


%post

    apt-get -y update

    apt-get -y install fortune cowsay lolcat


%environment

    export LC_ALL=C

    export PATH=/usr/games:$PATH


%runscript

    fortune | cowsay | lolcat
You can do so with the following command.
$ sudo singularity build lolcow.simg Singularity
The command requires sudo just as installing software on your local machine
requires root privileges.
--force
You can build into the same container multiple times (though the results may be unpredictable and it is generally better to delete your container and start from scratch).
By default if you build into an existing container, the build command will
skip the steps involved in adding a new base. You can override this
default with the --force option requiring that a new base OS is bootstrapped
into the existing container. This behavior does not delete the
existing OS, it just adds the new OS on top of the existing one.
Use care with this option: you may get results that you did not expect.
--section
If you only want to build a single section of your Singularity recipe
file use the --section option. For instance, if you have edited the %environment section of a
long Singularity recipe and don’t want to completely re-build the
container, you could re-build only the %environment section like so:
$ sudo singularity build --section environment image.simg Singularity
Under normal build conditions, the Singularity recipe file is saved into
a container’s meta-data so that there is a record showing how the
container was built. Using the --section option may render this meta-data useless,
so use care if you value reproducibility.
--notest
If you don’t want to run the %test section during the container build, you can
skip it with the --notest option. For instance, maybe you are building a
container intended to run in a production environment with GPUs. But
perhaps your local build resource does not have GPUs. You want to
include a %test section that runs a short validation but you don’t want your
build to exit with an error because it cannot find a GPU on your system.
$ sudo singularity build GPU.simg --notest Singularity
--checks
Checks are a new feature (in 2.4) that offer an easy way for an admin to define a security (or any other kind of check) to be run on demand for a Singularity image. They are defined (and run) via different tags.
CHECKS OPTIONS:

    -c|--checks    enable checks

    -t|--tag       specify a check tag (not default)

    -l|--low       Specify low threshold (all checks, default)

    -m|--med       Perform medium and high checks

    -h|--high      Perform only checks at level high
When you add the --checks option along with applicable tags to the build command
Singularity will run the desired checks on your container at build time.
See singularity check --help for available tags.
More Build topics
If you want to customize the cache location (where Docker layers are downloaded on your system), specify Docker credentials, or any custom tweaks to your build environment, see build environment.
If you want to make internally modular containers, check out the getting started guide here
If you want to build your containers on Singularity Hub, (because you don’t have root access on a Linux machine or want to host your container on the cloud) check out this guide