Singularity Flow
This document describes a suggested “best-practices” work-flow for building, running, and managing your containers.
There are generally two ways to get images. You either want to pull an image file as is, or (more likely) build your own custom image. We will start with talking about build and the many different use cases it affords.
Building Images
If you read the quick start, you probably remember that building images from a Docker base does not require a Singularity recipe. However, if you do want to build and customize your image, you can create a Singularity recipe text file, which is a simple text file that describes how the container should be made.
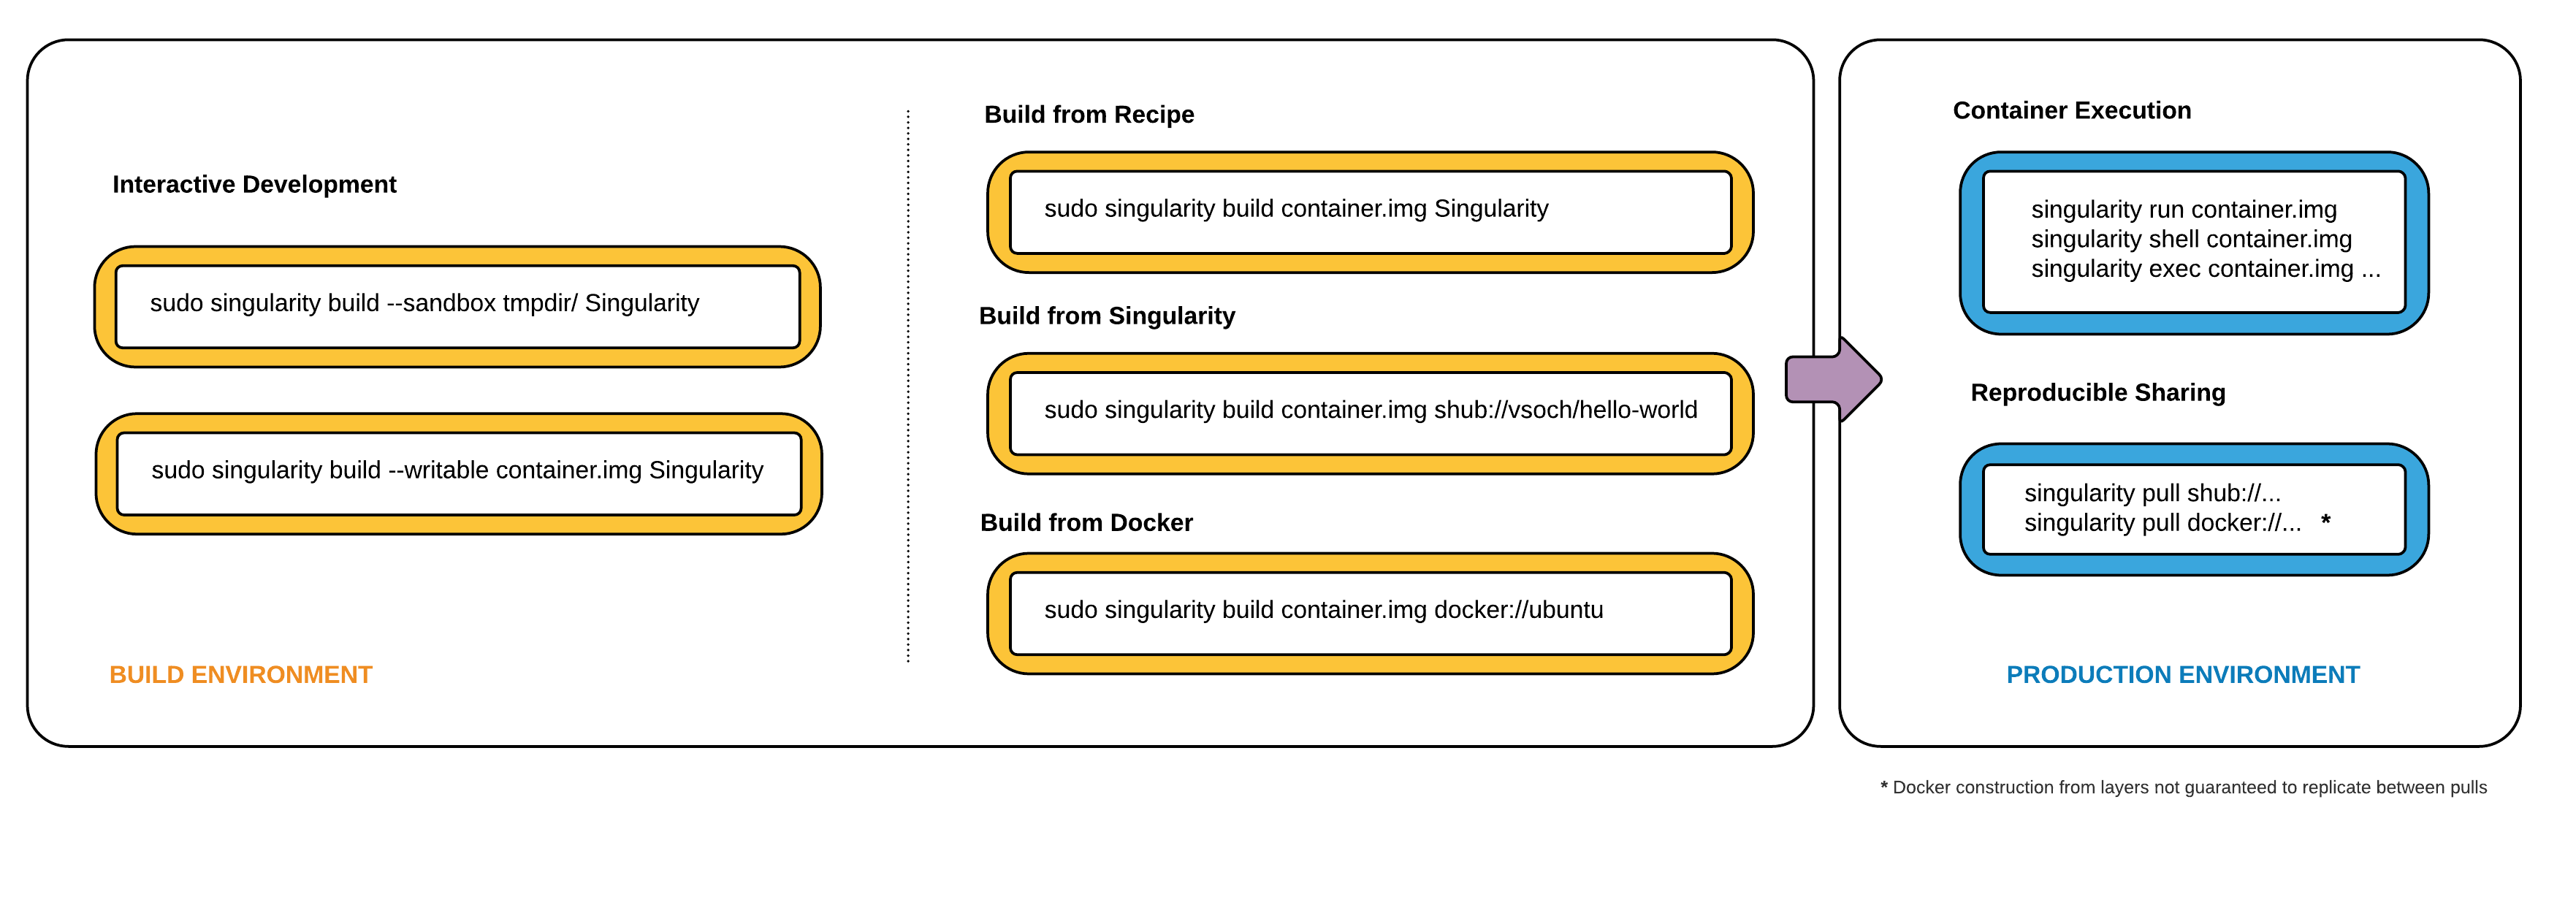
The Singularity Flow
The diagram below is a visual depiction of how you can use Singularity to build images. The high level idea is that we have two environments:
a build environment (where you have sudo privileges) to test and build your container
a production environment where you run your container
Singularity Workflow
Singularity production images are immutable. This is a feature added as of Singularity 2.4, and it ensures a higher level of reproducibility and verification of images. To read more about the details, check out the build docs. However, immutability is not so great when you are testing, debugging, or otherwise want to quickly change your image. We will proceed by describing a typical work-flow of developing first, building a final image, and using it in production.
1. Development Commands
If you want a writable image or folder for developing, you have two options:
build into a directory that has writable permissions using the
--sandboxoptionbuild into an ext3 image file, that has writable permissions with the
--writableoption
In both cases you will need to execute your container with the --writable option at
runtime for your changes to be persistent.
Sandbox Folder
To build into a folder (we call this a “sandbox”) just ask for it:
$ sudo singularity build --sandbox ubuntu/ docker://ubuntu

Docker image path: index.docker.io/library/ubuntu:latest

Cache folder set to /root/.singularity/docker

Importing: base Singularity environment

Importing: /root/.singularity/docker/sha256:9fb6c798fa41e509b58bccc5c29654c3ff4648b608f5daa67c1aab6a7d02c118.tar.gz

Importing: /root/.singularity/docker/sha256:3b61febd4aefe982e0cb9c696d415137384d1a01052b50a85aae46439e15e49a.tar.gz

Importing: /root/.singularity/docker/sha256:9d99b9777eb02b8943c0e72d7a7baec5c782f8fd976825c9d3fb48b3101aacc2.tar.gz

Importing: /root/.singularity/docker/sha256:d010c8cf75d7eb5d2504d5ffa0d19696e8d745a457dd8d28ec6dd41d3763617e.tar.gz

Importing: /root/.singularity/docker/sha256:7fac07fb303e0589b9c23e6f49d5dc1ff9d6f3c8c88cabe768b430bdb47f03a9.tar.gz

Importing: /root/.singularity/metadata/sha256:22e289880847a9a2f32c62c237d2f7e3f4eae7259bf1d5c7ec7ffa19c1a483c8.tar.gz

Building image from sandbox: ubuntu/

Singularity container built: ubuntu/
We now have a folder with the entire ubuntu OS, plus some Singularity metadata, plopped in our present working directory.
 $ tree -L 1 ubuntu

ubuntu

├── bin

├── boot

├── dev

├── environment -> .singularity.d/env/90-environment.sh

├── etc

├── home

├── lib

├── lib64

├── media

├── mnt

├── opt

├── proc

├── root

├── run

├── sbin

├── singularity -> .singularity.d/runscript

├── srv

├── sys

├── tmp

├── usr

└── var
And you can shell into it just like a normal container.
$ singularity shell ubuntu

Singularity: Invoking an interactive shell within container...


Singularity ubuntu:~/Desktop> touch /hello.txt

touch: cannot touch '/hello.txt': Permission denied
You can make changes to the container (assuming you have the proper
permissions to do so) but those changes will disappear as soon as you
exit. To make your changes persistent across sessions, use the --writable option.
It’s also a good practice to shell into your container as root to
ensure you have permissions to write where you like.
$ sudo singularity shell ubuntu

Singularity: Invoking an interactive shell within container...


Singularity ubuntu:/home/vanessa/Desktop> touch /hello.txt
Writable Image
If you prefer to work with a writable image file rather than a
directory, you can perform a similar development build and specify the --writable
option. This will produce an image that is writable with an ext3 file
system. Unlike the sandbox, it is a single image file.
$ sudo singularity build --writable ubuntu.img docker://ubuntu

Docker image path: index.docker.io/library/ubuntu:latest

Cache folder set to /root/.singularity/docker

Importing: base Singularity environment

Importing: /root/.singularity/docker/sha256:9fb6c798fa41e509b58bccc5c29654c3ff4648b608f5daa67c1aab6a7d02c118.tar.gz

Importing: /root/.singularity/docker/sha256:3b61febd4aefe982e0cb9c696d415137384d1a01052b50a85aae46439e15e49a.tar.gz

Importing: /root/.singularity/docker/sha256:9d99b9777eb02b8943c0e72d7a7baec5c782f8fd976825c9d3fb48b3101aacc2.tar.gz

Importing: /root/.singularity/docker/sha256:d010c8cf75d7eb5d2504d5ffa0d19696e8d745a457dd8d28ec6dd41d3763617e.tar.gz

Importing: /root/.singularity/docker/sha256:7fac07fb303e0589b9c23e6f49d5dc1ff9d6f3c8c88cabe768b430bdb47f03a9.tar.gz

Importing: /root/.singularity/metadata/sha256:22e289880847a9a2f32c62c237d2f7e3f4eae7259bf1d5c7ec7ffa19c1a483c8.tar.gz

Building image from sandbox: /tmp/.singularity-build.VCHPpP

Creating empty Singularity writable container 130MB

Creating empty 162MiB image file: ubuntu.img

Formatting image with ext3 file system

Image is done: ubuntu.img

Building Singularity image...


Cleaning up...


Singularity container built: ubuntu.img
You can use this image with commands like shell, exec , run , and if you want to
change the image you must use the --writable flag. As before, it’s a good idea to
issue these commands as root to ensure you have the proper permissions
to write.
$ sudo singularity shell --writable ubuntu.img


Development Tip! When building containers, it often is the case that

you will have a lot of testing of installation commands, and if

building a production image, one error will stop the entire build.

If you interactively write the build recipe with one of these

writable containers, you can debug as you go, and then build the

production (squashfs) container without worrying that it will error

and need to be started again.
2. Production Commands
Let’s set the scene - we just finished building our perfect hello world
container. It does a fantastic hello-world analysis, and we have written
a paper on it! We now want to build an immutable container - meaning
that if someone obtained our container and tried to change it, they
could not. They could easily use the same recipe that you used (it is
provided as metadata inside the container), or convert your container to
one of the writable formats above using build . So your work can still be
extended.
Recommended Production Build
What we want for production is a build into a squashfs image . Squashfs is a read only, and compressed filesystem, and well suited for confident archive and re-use of your hello-world. To build a production image, just remove the extra options:
sudo singularity build ubuntu.simg docker://ubuntu

Docker image path: index.docker.io/library/ubuntu:latest

Cache folder set to /root/.singularity/docker

Importing: base Singularity environment

Importing: /root/.singularity/docker/sha256:9fb6c798fa41e509b58bccc5c29654c3ff4648b608f5daa67c1aab6a7d02c118.tar.gz

Importing: /root/.singularity/docker/sha256:3b61febd4aefe982e0cb9c696d415137384d1a01052b50a85aae46439e15e49a.tar.gz

Importing: /root/.singularity/docker/sha256:9d99b9777eb02b8943c0e72d7a7baec5c782f8fd976825c9d3fb48b3101aacc2.tar.gz

Importing: /root/.singularity/docker/sha256:d010c8cf75d7eb5d2504d5ffa0d19696e8d745a457dd8d28ec6dd41d3763617e.tar.gz

Importing: /root/.singularity/docker/sha256:7fac07fb303e0589b9c23e6f49d5dc1ff9d6f3c8c88cabe768b430bdb47f03a9.tar.gz

Importing: /root/.singularity/metadata/sha256:22e289880847a9a2f32c62c237d2f7e3f4eae7259bf1d5c7ec7ffa19c1a483c8.tar.gz

Building Singularity image...

Cleaning up...

Singularity container built: ubuntu.simg
Production Build from Sandbox
We understand that it might be wanted to build a Singularity (squashfs) from a previous development image. While we advocate for the first approach, we support this use case. To do this, given our folder called “ubuntu/” we made above:
sudo singularity build ubuntu.simg ubuntu/
It could be the case that a cluster maintains a “working” base of container folders (with writable) and then builds and provides production containers to its users.
If you want to go through this entire process without having singularity installed locally, or without leaving your cluster, you can build images using Singularity Hub.